... or, Why it takes me so long to post pictures after a vacation
Sometime over the past couple months I decided to invest the time to improve my photography. Over the years I had accumulated a collection of snapshots, which were useful to show people where I had been, but weren't all that attractive. More importantly, the pictures I brought home didn't always tell the story of what I was experiencing while away from home. I had some "training" years ago in a high school photography class, but only recently have the lessons Mr. Granger taught me back then finally started to sink in.
With quite a few Disney trips, I was lucky to stumble upon the Disney photography community. Just looking at how others captured the parks inspired me to bring home better images and also gave me practical ideas for things I could do differently. One recent example of that is
+Cory Disbrow's article on the
Disney Photography Blog about
Adobe Lightroom. The article features a video showing steps the author takes while editing a photograph in Lightroom and included several practical suggestions, including the use of a "graduated filter" to edit different sections of a picture with different settings. This has proven particularly useful for finding details and color out of the sky that may otherwise be hidden.
Let's take a look at a couple examples of what post-processing in Lightroom can do.
Example 1: World Showcase Lagoon


Take a look at the first picture of World Showcase Lagoon. That's straight out of the camera. Now look at the second image. See a lot more detail, a bluer sky, and greener trees? That's what I saw when I actually took the picture. The first picture looks dark and doesn't show the beautiful Florida sunlight and obscures the interesting cloud formations that I saw. By reducing highlights and increasing the saturation of selected colors and increasing the light in the "shadows" this otherwise mediocre photo becomes much more attractive and a better representation of my day in Disney World.
Here is a larger version of the image with no processing:

and here is a larger version of the "finished" image:

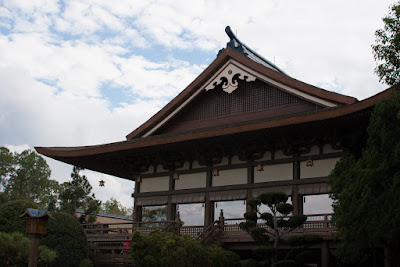
Example 2: Epcot's Japan Pavilion
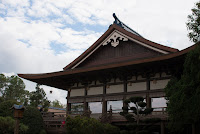
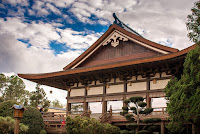
Look how much detail is not visible in the out of camera picture of the front of the Japan pavilion in Epcot. Look at how little detail you find in the sky. This was a great opportunity to use the graduated filter tool to underexpose the top portion of the photo, while increasing the exposure in the lower half in the image. By doing so, the detail in the clouds was more evident, as was the blue in the sky, while bringing more light to the building in the foreground. This is similar to the idea of HDR photos, where you combine several different images, taken at different exposure lengths, into one, but here there was enough detail in the single image to create much the same effect in post-processing.
Here is a larger version of the image with no processing:
and here is a larger version of the "finished" image:

One note, to get the most out of Lightroom, Photoshop, or most other photo editing software, is to shoot in RAW mode, if your camera supports it (and many, including a good deal of point and shoot cameras, now do). The detail saved in the RAW image versus what is saved in a JPEG can be stunning. The only downside is that you'll fill up your memory cards a lot faster, but you don't need to keep the RAW files for every vacation photo, only the ones you want to spend some time processing. Just keep in mind that you may be able to recover some shots that didn't turn out the way you hoped, even long after you return from your travels.
This should give you an idea why you may want to spend time processing your photos at home. If you want to learn more about how to do this, then I'll again suggest the recent
Disney Photography Blog entry showing Lightroom in action. It's full of tips for a variety of different skill levels, so you may want to watch this a couple times as you get more familiar with the tool.
If this topic was of interest to some of our readers, then I'll share more photography tips as I continue to learn.