Showing posts with label photography. Show all posts

Friday, April 11, 2014

Photo Friday: What is HDR?

Have you heard of talk of HDR images, but aren't quite sure what it means? Have you run into a situation where you want to capture a scene with very bright and very dark areas? If so, then you may want to see if HDR images will be a good fit. Creating them is not as difficult as you might think. Today's post is not intended as a tutorial on how to create HDR images, but rather to introduce those to what these images are and how they are created.

.
HDR stands for High Dynamic Range. The basic idea of HDR photography is that you combine several photos of the same scene into one image that properly (what "properly" means is left to the judgment of the photographer) exposes a wider range of light and dark than a single image would include. This is accomplished by taking a series of pictures at different exposures, some under-exposed, some over-exposed, and some close to what the camera light meter would regard as "correct." Typically, HDR images will include a series of three photographs, but some scenes call for seven, nine, or occasionally more exposures. A variety of software programs (I use Photomatix) can then combine those series of images into one and offer a handful of built-in images and a myriad of options for processing. Like many aspects of photography, you can quickly create images or spend hours processing, depending on your comfort level with the software and how picky you are about your finished product. A few minutes in Photomatix (or similar software) can create a pretty stunning image, while the incremental gains from spending more time in the software may only be appreciated by you or a few people who will see your image. Whether or not that is important, is up to you.

Let's take a look at a couple examples

EXAMPLE #1

Take a look at the image below. It was created by taking three pictures on my digital SLR camera and combining them in Photomatix. This image used one of the built-in Photomatix templates, with no further processing, so it only took a few minutes for me to click through the choices built-in choices in the software and then save my final product.


Here are the three original pictures that were combined to create the final image. Look at how dark the shadows are in the first image and then notice how washed on the light areas are in the last image. HDR lets you take the "best" (obviously, that term is subjective) parts of each picture to create your finished product.


EXAMPLE #2

This next photograph is one of my favorites and was taken with my Canon Powershot point and shoot camera. It shows that you don't need an expensive DLSR camera to produce great results and/or to create HDR images.

This camera does have a "bracket" feature that automatically takes a series of three images at different exposures

The Beach in Atlantic City

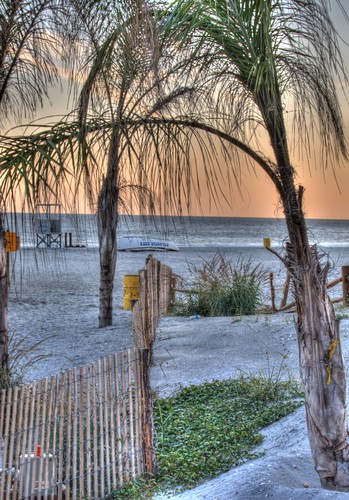
One feature my point and shoot camera does include is the ability to "bracket" a scene. When this option is turned on, the camera will take three pictures, each exposed a little differently. Notice the different shades of orange in the sky from the three images below. Combine that with some of the brightness in the foreground and have end up with a more attractive final image.

You may also notice that I didn't hold the camera completely still for this series of pictures. Photomatix was able to adjust for the slightly different composition (look at the trees on the left or right of the screen to see how the camera moved) and automatically crop the part of the image that was the same in all three pictures.


EXAMPLE #3

This is one of my more ambitious HDR projects thus far. I was an image of the France pavilion in Walt Disney World's Epcot, taken a night. I wanted to capture the attractive fountains in the foreground, then lighted topiary near the center of the image, along with the faux-city streets and building surrounding the scene.


As you can see from the series of photographs I took, no one image shows the best of the whole scene. Since this required many pictures, each with long exposures, I used a tripod to be able to hold the camera still and pointed at the same place.

The fountains look great in the first image, but most of the rest of the scene is too dark. The last couple images illuminate some of the brickwork on the buildings, but there isn't much else that looks good. Some of the images in the middle look pretty good, but the windows and the fountains are much brighter/more washed out than I wanted.


I hope this gives folks an idea what HDR photography can look like. There are many more examples out there, but these illustrate how you can get started. Let us know if this helps and be sure to share what you've created!

Friday, April 19, 2013

Photo Friday: What's in Your Camera Bag?

I recently talked about some of what I carry when I travel to support my electronics, but today I want to focus on the items in my camera bag.  These items are ready to go whenever I leaved the house with my digital SLR camera.


I'll leave out the camera itself, since when I travel that often spends more time around my neck than actually in the camera bag.  I also left it out of the photo because I was using it to take the picture above.  The rest of the items in my camera bag are as follows:

  • An Extra Lens
    • I still use the "kit" lens that I purchased with my camera years ago, a Canon 18-55mm zoom lens (pictured above).  Lately, more often than not I've had a Sigma 30mm f/1.4 lens that I purchased on Ebay attached to the camera body
  • Extra Batteries
    • In addition to my digital SLR, I also often carry a point and shoot camera as a backup and a small video camera.  Extra batteries for both these and the SLR live in my bag
  • Battery Chargers
    • Even carrying extra batteries doesn't mean I won't have to charge them before return home, so the chargers always come with me on the road.
  • Extra Memory Cards
    • Both CompactFlash and SD cards to accommodate the different cameras I carry
  • Cables to Connect to a Computer
    • Both the still and video cameras connect to my laptop via USB cable.  I try to download whatever I shot before the end of each day to my computer in case I need to clear the memory cards, as a backup if something happens to my camera and/or memory card, and to see how the pictures and videos from the day turned out (in case there's something I may have a chance to reshoot before I return from wherever I'm traveling)
  • Cable to Connect to a TV
    • I rarely use this anymore, but there's still a cable with an RCA connector in case I want to plug the camera into a television and look at pictures
  • Remote Shutter Release
    • keeps the camera from wobbling when you're shooting on a tripod.  It is very difficult not to move the camera a little when you actually press the shutter button, so this inexpensive device solves that problem.  It's also a big help for long (bulb) exposures, so you don't have to hold your finger on the shutter button. Here's a link to the one I bought, but you can find similar items for your camera.
  • Lens Cleaning Stuff
    • I've been fighting a losing battle against dust and smudges on my lenses for awhile now, but some things that help are a lens cleaning pencloth, and wipes.
  • Neutral Density Filters
    • I have these mostly to allow longer exposures of fireworks photos, but any time a longer exposure is needed these are a great addition to the bag.  I bought an expensive Hoya 77mm Neutral Density ND-400 filter a year ago, which I haven't really mastered yet, but I'm liking the adjustable NEEWER® 77mm (ND2 to ND400) filter I bought a couple months ago.
  • Extra Lens Cap
    • Though I have not yet actually lost a lens cap, I've dropped one in my backpack or otherwise misplaced one for an extended period of time on more than one occasion, so I finalized purchased a spare, though I now need another for my Sigma lens
  • Cheap Poncho
    • I've spent enough time in Orlando over the past year that it pays to be prepared if the weather takes a turn for the worse.  This isn't very durable, but I got this four pack for under $5.


Thursday, April 11, 2013

What's So Special About Wishes?


At some point in the past year I've become a convert.  Fireworks shows are fun, but for quite a while I preferred to use the time when most Disney World guests gather for fireworks to take advantage of the shorter lines for attractions.  After all, there's nothing all that special about watching flashes of light in the air, right?  I figured I've already seen the evening shows, so why waste time fighting the crowds to see them again?  Besides, you can still sorta watch the fireworks while you're walking around the park.  Turned out I didn't realize what I was missing.

So what changed?  Why so many questions at the start of this article?  The answer begins last April, one evening after my cousin and his family decided to head off to bed after dinner and I decided it was too early for me to turn in.  I jumped aboard a boat from Disney's Wilderness Lodge to the Magic Kingdom and arrived just as Wishes was beginning.  Rather than fight my way through the crowds on Main Street or sneak through the gift shops, I decided to stop and watch the show.  When I walked through the turnstiles I headed straight up to the stairs to the train station on Main Street in time to see the last five minutes of the show.  The following evening, I returned to the Magic Kingdom with my cousin, his wife, and their five year old son.  All of us ended the evening watching the fireworks together, this time from the middle of Main Street, standing among the crowd, hearing the oohs and ahs from people around, including those in my family, who had never seen the show before.  So, maybe there was a little more to Disney World fireworks than I remembered.

Fast forward to late June when my sister and I returned to Disney World and she and I stopped and watched Wishes twice.  In between park visits I had purchased and read How to Photograph Fireworks, an ebook from the some of the contributors to the Disney Photography Blog, so I was eager to try out what I learned.  Unfortunately, I forgot to bring my tripod to the park the first night we visited the Magic Kingdom.  Fortunately, that meant we watched Wishes again the second night we were in the park.  Watching the show with my sister added another layer of sentimentality to the show, as two years before her now-husband proposed to her during a fireworks cruise on Seven Seas Lagoon.

My initial foray into fireworks photography was fun, but left plenty of room for improvement.  Thus, still not completely satisfied with the images from June (the first tripod I brought along was too short and I wanted to try shooting the show through a neutral density filter), I returned to the Magic Kingdom in late January of this year.  I had a day in the parks alone after watching a hockey game in Tampa the night before, and with no one else's schedule to keep but my own, I setup for the show well ahead of time, which meant I found a location with an unobstructed view of Cinderella Castle and also gave me a chance to setup a video camera.  The visuals I captured don't do Wishes justice, but the audio is pretty remarkable.

I setup my cameras (video and still) among one of the stroller parking areas facing the Magic Kingdom's castle.  After I scoped out my great location for the Celebrate the Magic projection show and Wishes a number of people came and went, some of whom picked up their strollers, which made more room along the rail where I was stationed.  A young family soon joined me in the same location, politely asking if they would be blocking my cameras.  They weren't, and I figured that even if they were that it was more important that the kids enjoyed the show than whether or not my pictures and video turned out the way I hoped.  As Magic Kingdom cast members moved everyone out of the nearby walkway, across the masking tape line they created, I urged the family to let their kids sit at the railing next to my cameras.  The family settled in, and it must have been instant karma that my video camera recorded their joy as they were amazed by what they saw.  It's pretty easy for regular visitors to Walt Disney World to take for granted some of the amazing spectacular shows the park offers, but spend a little time with some people who haven't been there before or who don't see the shows very often and it's pretty easy to remember some of what Disney does best.


Monday, January 14, 2013

Effects of Post Processing

... or, Why it takes me so long to post pictures after a vacation


Sometime over the past couple months I decided to invest the time to improve my photography.  Over the years I had accumulated a collection of snapshots, which were useful to show people where I had been, but weren't all that attractive.  More importantly, the pictures I brought home didn't always tell the story of what I was experiencing while away from home.  I had some "training" years ago in a high school photography class, but only recently have the lessons Mr. Granger taught me back then finally started to sink in.

With quite a few Disney trips, I was lucky to stumble upon the Disney photography community.  Just looking at how others captured the parks inspired me to bring home better images and also gave me practical ideas for things I could do differently.  One recent example of that is +Cory Disbrow's article on the Disney Photography Blog about Adobe Lightroom.  The article features a video showing steps the author takes while editing a photograph in Lightroom and included several practical suggestions, including the use of a "graduated filter" to edit different sections of a picture with different settings.  This has proven particularly useful for finding details and color out of the sky that may otherwise be hidden.


Let's take a look at a couple examples of what post-processing in Lightroom can do.

Example 1: World Showcase Lagoon


Take a look at the first picture of World Showcase Lagoon.  That's straight out of the camera.  Now look at the second image.  See a lot more detail, a bluer sky, and greener trees?  That's what I saw when I actually took the picture.  The first picture looks dark and doesn't show the beautiful Florida sunlight and obscures the interesting cloud formations that I saw.  By reducing highlights and increasing the saturation of selected colors and increasing the light in the "shadows" this otherwise mediocre photo becomes much more attractive and a better representation of my day in Disney World.


Here is a larger version of the image with no processing:


and here is a larger version of the "finished" image:


Example 2: Epcot's Japan Pavilion


Look how much detail is not visible in the out of camera picture of the front of the Japan pavilion in Epcot.  Look at how little detail you find in the sky.  This was a great opportunity to use the graduated filter tool to underexpose the top portion of the photo, while increasing the exposure in the lower half in the image.  By doing so, the detail in the clouds was more evident, as was the blue in the sky, while bringing more light to the building in the foreground.  This is similar to the idea of HDR photos, where you combine several different images, taken at different exposure lengths, into one, but here there was enough detail in the single image to create much the same effect in post-processing.


Here is a larger version of the image with no processing:


and here is a larger version of the "finished" image:


One note, to get the most out of Lightroom, Photoshop, or most other photo editing software, is to shoot in RAW mode, if your camera supports it (and many, including a good deal of point and shoot cameras, now do).  The detail saved in the RAW image versus what is saved in a JPEG can be stunning.  The only downside is that you'll fill up your memory cards a lot faster, but you don't need to keep the RAW files for every vacation photo, only the ones you want to spend some time processing.  Just keep in mind that you may be able to recover some shots that didn't turn out the way you hoped, even long after you return from your travels.

This should give you an idea why you may want to spend time processing your photos at home.  If you want to learn more about how to do this, then I'll again suggest the recent Disney Photography Blog entry showing Lightroom in action.  It's full of tips for a variety of different skill levels, so you may want to watch this a couple times as you get more familiar with the tool.

If this topic was of interest to some of our readers, then I'll share more photography tips as I continue to learn.